How to use Python with a COM library like HttpWatch

calendarMarch 22, 2019 in Automation , HttpWatch , Python

We occasionally get asked whether the HttpWatch automation library can be used with Python. The simple is yes – Python can be used just like any other programming language that supports COM on Windows. This blog post describes how to use the HttpWatch interface but the same approach can be used to access other COM components from Python.

Although, it’s possible to use simple, named based look-ups in COM (known as late binding) it’s better to use early binding as it has some key advantages:

  • Better performance as COM methods don’t have to queried by name before execution
  • It makes use of Python static typing – allowing IDEs (such as PyCharm) to provide intellisense and to detect syntax errors

The following steps show you how to build a static typed Python client for any COM library with example code for the HttpWatch automation library.

1. Prerequisites

Before starting to program in Python you’ll need to do the following:

  1. Install the latest version of Python
  2. Use an existing IDE or install one like PyCharm
  3. Create a directory or project for your Python code. In PyCharm configure the project to use the system Python interpreter rather than a per-project virtual environment. This makes it simpler to use the win32com module (see next section)

2. Install the Python pywin32 module

Python doesn’t have built-in in COM support so you’ll need to install the pywin32 module by manually running several commands.

Start a command prompt using an account with local admin rights. On Windows 10 you can right click on the Windows icon and select ‘Command Prompt (Admin)’

Run the following command to add pywin32 to Python:

python -m pip install pywin32

Then locate the post install script pywin32_postinstall.py. It should be in directory like this:

C:\Users\username\AppData\Local\Programs\Python\Python37\Scripts

Change to that directory and run this command to complete the setup:

C:\Users\username\AppData\Local\Programs\Python\Python37\Scripts>python pywin32_postinstall.py -install 

3. Generate the Python bindings for the COM library

After installing pywin32 use the makepy utility to generate a python binding file for the COM library you want to use. You can do this by creating and running the following Python file:

import sys
from win32com.client import makepy

outputFile = r"c:\mypythonclient\httpwatch_automation.py"
comTypeLibraryOrDLL = r"C:\Program Files (x86)\HttpWatch\httpwatchprox64.dll"
sys.argv = ["makepy", "-o", outputFile, comTypeLibraryOrDLL]

makepy.main ()

Set the outputFile variable to use the directory where you will create your Python client code. The comTypeLibraryOrDLLvariable should be set to the location of the Type Library (.tlb) or Dynamic Link Library (.dll) that implements the target COM library

The code above shows the values to use for HttpWatch but you can skip this step if you prefer and directly download the Python binding file that we generated with Python 3.7 and HttpWatch 11.1:

4. Import win32com.client and the Python bindings file

You’ll need two import statements in your Python code. The first allows win32com.client to be used for creating instances of COM classes and the second imports the classes and interfaces found in the target COM library:

import win32com.client
import httpwatch_automation as HttpWatch

The second import uses the base name of the Python binding file generated in step# 3 and wraps the types in the specified namespace (i.e. HttpWatch in this case). The binding file will be located automatically if it exists in the same directory as your Python code.

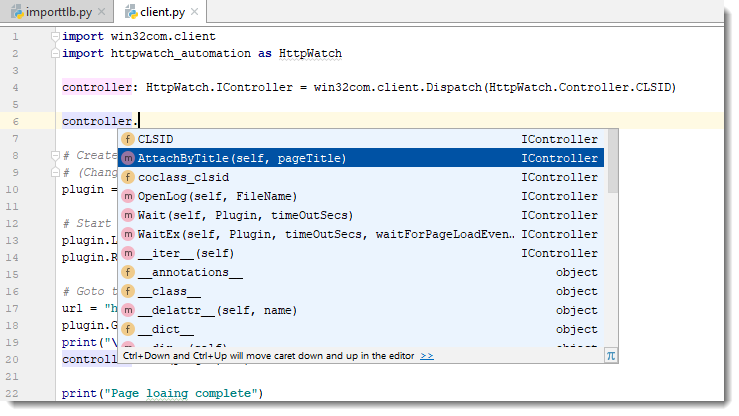
5. Use static binding to create an instance of the COM class

Python variables are dynamically typed by default. This means that they take on the type of whatever is assigned into them. You can change to using static typing by specifying the type after the variable declaration. In the code below we used HttpWatch.IController as that’s the interface type for the initial Controller COM class used by HttpWatch.

An instance of the HttpWatch Controller class is created by supplying its CLSID value to the win32com.client Dispatch method:

controller: HttpWatch.IController = win32com.client.Dispatch(HttpWatch.Controller.CLSID)

Once you’ve done this the IDE can provide intellisense when you write code using that variable:

Intellisense in PyCharm IDE

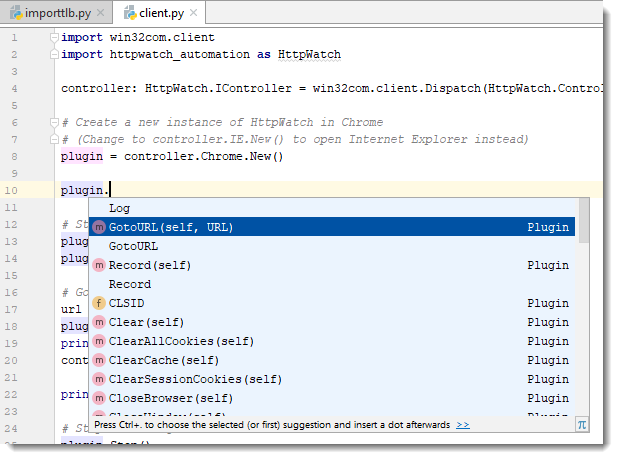
You don’t even need to specify the types for other variables that are used to hold values derived from the initial interface. The IDE can deduce their type by looking at the information in the Python binding file.

For example, the plugin variable is statically typed as the Plugin interface because the IDE knows that the New method returns a Plugin interface:

IDE deduces type of other variables

6. Write the rest of your code!

After setting up the type information you can then write the rest of the code required to interact with the COM library. Here’s an example that uses HttpWatch to open a page in Chrome and display some simple statistics about the network traffic:

import win32com.client
import httpwatch_automation as HttpWatch

controller: HttpWatch.IController = win32com.client.Dispatch(HttpWatch.Controller.CLSID)

# Create a new instance of HttpWatch in Chrome
# (Change to controller.IE.New() to open Internet Explorer instead)
plugin = controller.Chrome.New()

# Start Recording HTTP/HTTPS traffic
plugin.Log.EnableFilter(False)
plugin.Record()

# Goto to the URL and wait for the page to be loaded
url = "https://www.httpwatch.com/download/"
plugin.GotoURL(url)
print("\nWaiting for page to finish loading...")
controller.Wait(plugin, -1)

print("Page loaing complete")

# Stop recording HTTP/HTTPS
plugin.Stop()

if plugin.Log.Pages.Count != 0:
    print("\nPage Title: '" + plugin.Log.Pages(0).Title + "'")

    # Display summary statistics for page
    summary = plugin.Log.Pages(0).Entries.Summary
    print( "Total time to load page (secs):      " + str(summary.Time))
    print( "Number of bytes received on network: " + str(summary.BytesReceived))
    print( "HTTP compression saving (bytes):     " + str(summary.CompressionSavedBytes))
    print( "Number of round trips:               " + str(summary.RoundTrips))
    print( "Number of errors:                    " + str(summary.Errors.Count))

# Close down Chrome
plugin.CloseBrowser()

How to use Selenium automation with HttpWatch and Chrome

calendarJanuary 11, 2018 in Automation , C# , Chrome , HttpWatch

The HttpWatch automation interface provides programmatic control of HttpWatch in both IE and Chrome browsers. It can be used to develop tests in almost any programming language (e.g. C#, JavaScript, Ruby, etc) that capture low level network timings, errors and other statistics generated when a web page is accessed.

However this interface only provides a basic GotoURL method to navigate between pages. If your testing requires more interaction, for example submitting forms or clicking on buttons, we recommend using the Selenium automation framework. The latest HttpWatch update (version 11.1.19) includes several Selenium related improvements to make the integration even easier:

In Visual Studio you no longer the need to separately download and install Selenium. Simply add these two Nuget packages to your project:

Once you’ve done this, Selenium will be automatically downloaded and installed when you build your project. It also makes maintenance easier as Visual Studio will show you when updates to these packages are available.

Starting a session using both HttpWatch and Selenium in Chrome requires just a few simple steps. The first is creating Selenium with the HttpWatch extension installed:

Controller control = new Controller();
 
// Make sure the HttpWatch extension is enabled in the Selenium Chrome session by referencing the CRX file
// e.g. C:\Program Files (x86)\HttpWatch\HttpWatchForChrome.crx
// The HttpWatchCRXFile property returns the installed location of the CRX file
var options = new ChromeOptions();
options.AddExtension(control.Chrome.HttpWatchCRXFile);
 
// Start the Chrome browser session
var driver = new ChromeDriver(options);
 
// Goto blank start page so that HttpWatch recording can be started
driver.Navigate().GoToUrl("about:blank");

The new HttpWatchCRXFile property saves you having to hard code a path to the HttpWatch installation on your PC.

The next step is attaching HttpWatch to the instance of Chrome created by Selenium. This is achieved by setting a unique page title and then calling the AttachByTitle method:

// Set a unique title on the first tab so that HttpWatch can attach to it
var uniqueTitle = Guid.NewGuid().ToString();
driver.ExecuteScript("document.title = '" + uniqueTitle + "'");
 
// Attach HttpWatch to the instance of Chrome created through Selenium
Plugin plugin = control.AttachByTitle(uniqueTitle);

Once everything is setup you can use Selenium methods to interact with controls on the page and HttpWatch methods to control recording and lookup the required network level data or timings:

driver.Navigate().GoToUrl(url);
 
// Start recording now that page containing the form is loaded
plugin.Log.EnableFilter(false);
plugin.Clear();
plugin.Record();
 
// Put 200 in the amount field
driver.FindElement(By.Name("Amount")).Clear();
driver.FindElement(By.Name("Amount")).SendKeys("200");
 
// Click on the submit button
driver.FindElement(By.Name("B2")).Click();
 
Console.WriteLine("\r\nClicked on submit button...");
 
// Use the HttpWatch Wait call to ensure HTTP activity has ceased
control.Wait(plugin, -1);
 
// Stop recording HTTP
plugin.Stop();
 
// Read the updated account balance back from the page
string accountBalance = driver.FindElement(By.Id("balanceSpan")).Text;
 
if (plugin.Log.Pages.Count != 0)
{
    Console.WriteLine("\r\nPage Title: '" + plugin.Log.Pages[0].Title + "'");
    Console.WriteLine("\r\nNew account balance: " + accountBalance );
    Console.WriteLine();
 
    // Display summary statistics for page
    Summary summary = plugin.Log.Pages[0].Entries.Summary;
    Console.WriteLine("Total time to load page (secs):      " + summary.Time);
    Console.WriteLine("Number of bytes received on network: " + summary.BytesReceived);
    Console.WriteLine("HTTP compression saving (bytes):     " + summary.CompressionSavedBytes);
}
 
// Need to use Selenium Quit to correctly shutdown Selenium and browser
driver.Quit();

You can read more about the Selenium and Chrome sample code in the HttpWatch Automation documentation.

Installing a Chrome Extension Without An Internet Connection

calendarNovember 15, 2017 in Chrome , HttpWatch

Occasionally, our customers run into a problem when installing HttpWatch on a PC or server that has no internet access, e.g. to test web servers in a locked down production environment. The HttpWatch add-on for Internet Explorer installs and works correctly but the HttpWatch Chrome extension is not added because access to the Google Web Store is required for automatic installation.

Without an internet connection the HttpWatch Chrome extension has to be manually added using the steps shown in this blog post. Although the details below relate to HttpWatch, the same technique can be used to install any Chrome extension to an offline PC.

Step #1 – Download the Chrome Extension’s CRX file

Chrome extensions are packaged in CRX files and they can be manually downloaded from the Google Web Store. You’ll need to do that on another PC that is connected to the internet by either using a Google Chrome extension such as the Get CRX extension or by using the following download URL:

https://clients2.google.com/service/update2/crx?response=redirect&prodversion=78&acceptformat=crx2,crx3&x=id%3Ddajhhgiioackgdldomhppobgjbinhimh%26uc

(Download using a different browser as Chrome will block an attempt to access a CRX file.)

The general form of this download URL is:

https://clients2.google.com/service/update2/crx?response=redirect&prodversion=[PRODVERSION]&acceptformat=crx2,crx3&x=id%3D[EXTENSIONID]%26uc

Where [PRODVERSION] is the version of Chrome you’re using and [EXTENSIONID] is the extension ID. You can find the ID by looking at the extension in the Web Store and noting the last part of the URL. The acceptformat=crx2,crx3 argument is required for recent versions of Chrome that use the CRX3 header format.

For example, the ID of the HttpWatch extension is ‘dajhhgiioackgdldomhppobgjbinhimh’:

UPDATE: The CRX file is now available in the HttpWatch install directory (version 11.0.25+).

Step #2 – Add the CRX file to Chrome

Copy the CRX file to the offline PC and then open the Chrome extensions page (chrome:://extensions). Make sure that Developer Mode is enabled. Drag and drop the CRX file onto the extensions page to manually add the extension to Chrome:

After clicking ‘Add Extension’ the HttpWatch extension will be available in Chrome:

The extension is now fully installed and available for use. Of course, you will not receive automatic updates to the extension unless you connect to the internet or repeat steps 1) and 2). You can turn off Developer Mode again after installing the extension.

UPDATE #1: If you get a “Package is invalid ‘CRX_HEADER_INVALID'” error check that you are using the acceptformat=crx2,crx3 argument in the download URL.

UPDATE #2: recent versions of Chrome reject the CRX with the error “Apps, extensions and user scripts cannot be added from this website”. A work-around for this error is to enable Developer Mode on the extensions page. You can switch Developer Mode off again after you have installed the extension.

Ready to get started? TRY FOR FREE Buy Now