Image Caching in Internet Explorer

calendarFebruary 27, 2008 in Caching , HttpWatch , Internet Explorer , Optimization

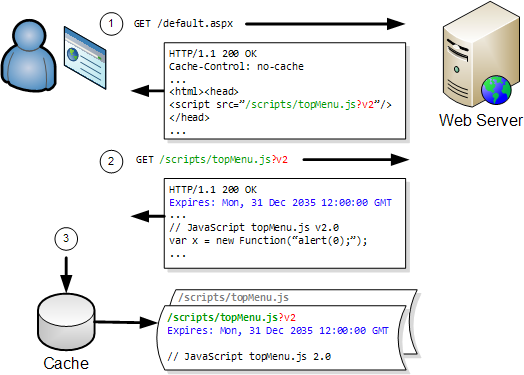
If you build, maintain or tune web sites you’ll know about the browser cache and how to control caching using HTTP response headers. We’ve talked about caching in several previous posts.

However, you may not be aware that IE uses two caches for holding images. First, there is the regular browser cache that keeps a copy of downloaded image files in your Temporary Internet Files folder. It’s this cache that can be controlled by HTTP response headers such as Cache-Control and Expires.

There is also an image cache that IE uses to hold recently used images in memory. The main difference between the image cache and the browser cache is:

  • The image cache is never written to disk and is always emptied when IE closes
  • The image cache contains an expanded, Windows bitmap version of  GIF, JPG or PNG files
  • HttpWatch does not record access to the image cache, unlike the 304 and (Cache) responses that you’ll see when IE reads content from the browser cache

The point of the image cache is that it can be used to quickly render images without taking the CPU hit required to convert them from their native compressed format into a Windows bitmap.

The only documentation about the image cache is the “Image Cache Limits” section of the registry settings for IE on Windows CE:

http://msdn2.microsoft.com/en-us/library/aa908131.aspx

Here’s the relevant section:

Image Caching in Windows CE

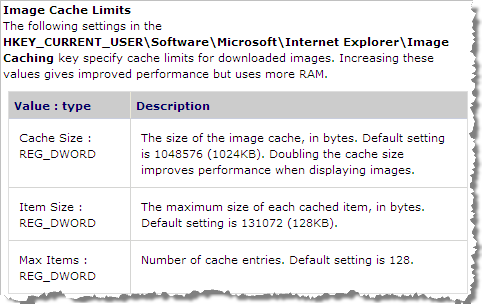
Although, these settings don’t work with IE 6 or 7 they do show that the image cache has limits on the size of images, the number of images cached and the maximum amount of memory that can be used. Limits like this have to be set because the expanded images can take up to 500% more memory than the original PNG, GIF or JPG format.

Let’s see the effect of the image cache by starting a new instance of IE and visting www.httpwatch.com:

Images loaded from browser cache

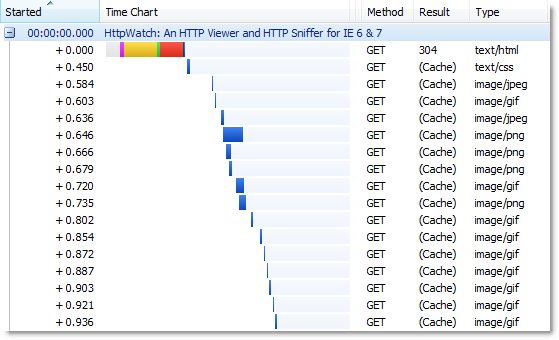
The (Cache) responses shown in HttpWatch indicate that the images on our home page were read from the browser cache.  The image cache would have been empty at this point because IE had just started.

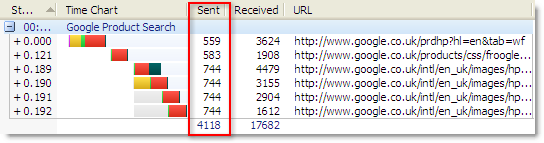
If you click on the Download tab and then click back on the Home page tab you’ll see that only two images are shown in the resulting HttpWatch trace:

Image Caching on HttpWatch home page

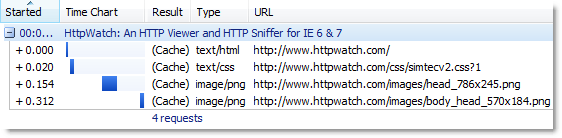
Clearly, all the images for the home page must have been loaded from somewhere because the page was correctly rendered, but only two images requests from the browser cache are seen in HttpWatch. This is because the other images were read from the image cache.

Why were two of the PNG files still read from the browser cache? These two images are the largest image files on the page and they would expand to approximately 500 KB and 300 KB if they were both placed in the image cache. They probably breached the maximum image size limit in the IE 7 image cache and were therefore not stored in their expanded form.

It’s also possible to see that the image cache has a limit on the number of images it stores. Try visiting ebay.com and then yahoo.com in the same browser window to load up the image cache. If you then go back to www.httpwatch.com you’ll see that all the images have been flushed out of the image cache and had to be reloaded from the browser cache.

So, to make effective use of the image cache in IE you should:

  1. Minimize the number of images that your site uses
  2. Avoid single images that might expand to more than approx 200 KB

Of course, you should always try to minimize the number of images to reduce the network round-trips when a browser first loads a page. A popular technique for doing this is to use CSS sprites to merge several images together and there are some great tools to help you create the compound image.

Be careful though, that you don’t run into item 2) by creating a single large image that is not loaded into the image cache. You would get the benefit of less round trips on an initial visit, but the rendering in IE might actually be slower because the image would have to expanded from the browser cache whenever it was re-displayed.

The Performance Impact of Uploaded Data

calendarJanuary 18, 2008 in Caching , HTTP , HttpWatch , Optimization

Web developers are becoming more aware of the performance penalties of page bloat and as we covered in our previous posts there are ways to mitigate this, compression being just one.

However, one of the causes of poor performance that is often overlooked is the transmission time taken to upload data to the server. Although, HTTP request messages are typically smaller than HTTP response messages, the performance cost can be an order of magnitude higher per byte. This is caused by the asymmetric nature of many consumer broadband connections.

For example, the results of a speed test on a UK broadband cable connection are shown here:

Broadband Speed Test

The upload speed is only about 6% of the download speed. That means, byte for byte, uploaded data takes about 16 times as long to transmit as the equivalent amount of downloaded data.

To put it another way, if you upload 4 KB of data in an HTTP request message it may take the same length of time as downloading a 64 KB page.

You can easily see the size of the HTTP request message by looking at the Sent column in HttpWatch:

 Sent Column

The value shown in the Sent Column is made up of the size of the following items:

  • The HTTP GET or POST request line
  • HTTP request headers
  • Form fields and uploaded files sent with POST requests

Unfortunately, request data is never compressed because there is no server-side equivalent of the Accept-Encoding request header that is used by browsers to indicate that they support compression of downloaded content.

For a typical site, you might be surprised to know that the request data can be up to 50% of the size of the response data. Since many broadband connections are asymmetric, this can have a substantial impact on performance. Here’s an example of a flight search page on Expedia:

Upload / Download Ratio

The ratio increases as the downloaded content is cached by the browser, often making uploaded data the most significant factor in the performance of a web page.

So what can be done to reduce the amount of uploaded data?

Step 1: Minimize the size of Cookies

Cookies are simply part of the request headers. Expedia uses around 9 cookies which are fortunately quite small but it’s easily possible to end up with a lot of cookie data, particularly if you’re using 3rd party web frameworks. RFC2109 specifies that browsers should support at least 20 cookies for each domain and at least 4K of data per cookie.

The problem with cookies is that they need to be sent with every single HTTP request where the URL is in the domain and path to which they apply. That includes requests for style-sheets, images and scripts.  So in most cases the amount of cookie data uploaded, is effectively multiplied by the number of requests per page.

One way to reduce the amount of cookie data (apart from making them as small as possible and using them less) is to use different domains or paths for your content. For instance, you probably need cookies in your page processing code but you don’t need them for static content such as images. If you put static content in a different location, cookie data will not be sent because cookies are domain and path specific.

Another way to reduce cookie data is to look at server-side storage, such as using the session state management of a framework like ASP.NET. You can then use a single cookie that just contains a session id and look up any session related data on the server when required. Of course, this may have an impact on server side performance, but it is a useful way of minimizing the amount of cookie data that a site requires.

Step 2: Avoid Excessive use of Hidden Form Fields

There are two sets of data in a typical HTML form:

  1. Fields you want the user to fill out with information.
  2. Hidden fields.

You can’t really do much about the first type, except reducing the size of your field names. This may be difficult depending on your implementation framework.

Hidden fields are used to maintain page-scoped variables that will be required by the server when the form is submitted, e.g. a user ID. They may also be injected by various web frameworks or server-side controls. One such example is the __VIEWSTATE field used by ASP.NET as shown below:

ASP.NET hidden fields

There are two reasons for doing this. Firstly it’s easier to have the state to hand (so to speak) in your page logic and secondly it often scales better across a web farm by keeping page scoped state within the page rather than fetching it from somewhere else like a database. 

One way to reduce the amount of data in hidden fields is to only use a single key in a hidden form field. The key value is then used on the server to retrieve the data required to process the submitted page. This is exactly like the approach used to reduce the amount of cookie data.  And like with cookies, reducing request transmission time in this way may have an impact on server-side performance and scalability.

Step 3: Avoid Verbose URLs

This is not the most important issue on the list, but it is still worth considering. In practice there are no ubiquitous limits on URL length, but most browsers will struggle with URLs longer than 4 KB – some may struggle at 1 KB or less. Remember that your URL will also end up in the referrer header of images and other embedded resources.

It’s usually the query string parameters that make a URL overly long. Again using Expedia as an example, you can see how many sites use these variables:

http://www.expedia.com/pub/agent.dll?qscr=fexp&flag=q&city1=lon&citd1=bos&date1=1/22/2008&time1=362&
date2=1/22/2008&time2=362&cAdu=1&cSen=&cChi=&cInf=&infs=2&
tktt=&trpt=2&ecrc=&eccn=&qryt=8&load=1&airp1=&dair1=&rdct=1&
rfrr=-429

In this case the URL is used to quickly pinpoint a results page for flights between ‘city1′ London (LON) and ‘city2′ Boston (BOS) on specific dates.

Encoding data like this in URLs does have certain advantages. If you bookmark or share the URL the same results will be displayed when the URL is next used. However, if the URL contains unused or redundant data it may be causing a significant increase in the amount of uploaded data.

Two Simple Rules for HTTP Caching

calendarDecember 10, 2007 in Caching , HTTP , HttpWatch

In practice, you only need two settings to optimize caching:

  1. Don’t cache HTML
  2. Cache everything else forever

“Wooah…hang on!”, we hear you say. “Cache all my scripts and images forever?

Yes, that’s right. You don’t need anything else in between. Caching indefinitely is fine as long as you don’t allow your HTML to be cached.

“But what about if I need to issue code patches to my JavaScript? I can’t allow browsers to hold on to all my images either. I often need to update those as well.”

Simple – just change the URL of the item in your HTML and it will bypass the existing entry in the cache.

In practice, caching ‘forever’ typically means setting an Expires header value of Sun, 17-Jan-2038 19:14:07 GMT since that’s the maximum value supported by the 32 bit Unix time/date format. If you’re using IIS6 you’ll find that the UI won’t allow anything beyond 31-Dec-2035. The advantage of setting long expiry dates is that the content can be read from the local browser cache whenever the user revisits the web page or goes to another page that uses the same images, script or CSS files.

You’ll see long expiry dates like this if you look at a Google web page with HttpWatch. For example, here are the response headers used for the main Google logo on the home page:

Google Expires header

If Google needs to change the logo for a special occasion like Halloween they just change the name of the file in the page’s HTML to something like halloween2007.gif.

The diagram below shows how a JavaScript file is loaded into the browser cache on the first visit to a web page:

Accessing page with empty cache

On any subsequent visits the browser only has to fetch the page’s HTML:

Read from cache

The JavaScript file can be read directly from the browser cache on the user’s hard disk. This avoids a network round trip and is typically 100 to 1000 times faster than downloading the file over a broadband connection.

The key to this caching scheme is to keep tight control over your HTML as it holds the references to everything else on your web site. One way to do this is to ensure that your pages have a Cache-Control: no-cache header. This will prevent any caching of the HTML and will ensure the browser requests the page’s HTML every time.

If you do this, you can update any content on the page just by changing the URL that refers to it in the HTML. The old version will still be in the browser’s cache, but the updated version will be downloaded because of the modified URL.

For instance, if you had a file called topMenu.js and you fixed some bugs in it, you might rename the file topMenu-v2.js to force it to be downloaded:

Force update with new file name

Now this is all very well, but whenever there’s a discussion of longer expiration times, the marketing people get very twitchy and concerned that they won’t be able to re-brand a site if stylesheets and images are cached for long periods of time.

In fact, choosing an expiration time of anything other than zero or infinite is inherently uncertain. The only way to know exactly when you can release a new version to all users simultaneously is to choose a specific time of day for your cache expiry; say midnight. It’s better to set indefinite caching on all your page-linked items so that you get the maximum amount of caching, and then force updates as required.

Now, by this point, you might have the marketing types on board but you’ll be losing the developers. The developers by now are seeing all the extra work involved in changing the filenames of all their CSS, javascript and images both in their source controlled projects and in their deployment scripts.

So here’s the icing on the cake; you don’t actually need to change the filename, just the URL. A simple way to do this is to append a query string parameter onto the end of the existing URL when the resource has changed.

Here’s the previous example that updated a JavaScript file. The difference this time is that it uses a query string parameter ‘v2’ to bypass the existing cache entry:

Force update with query string

The web server will simply ignore the query string parameter unless you have chosen to do anything with it programmatically.

There’s one final optimization you can make. The Cache-Control: no-cache response header works well for dynamic pages as it ensures that pages will always be refreshed from the server; even when pressing the Back button. However, for HTML that changes less frequently it is better to use the Last-Modified header instead. This will avoid a complete download of the page’s HTML, if it has not changed since it was last cached by the browser.

The Last-Modified header is added automatically by IIS for static HTML files and can be added programmatically in dynamic pages (e.g. ASPX and PHP). When this header is present, the browser will revalidate the local, cached copy of an HTML page in each new browser session. If the page is unchanged the web server returns a 304 Not Modified response indicating the browser can use the cached version of the page.

So to summarize:

  1. Don’t cache HTML
    • Use Cache-Control: no-cache for dynamic HTML pages
    • Use the Last-Modified header with the current file time for static HTML
  2. Cache everything else forever
    • For all other file types set an Expires header to the maximum future date your web server will allow
  3. Modify URLs by appending a query string in your HTML to any page element you wish to ‘expire’ immediately.

Ready to get started? TRY FOR FREE Buy Now